Sesame Sticks

Sesame Sticks

Once every couple of  months or so (whenever we’re in town for the third Saturday, which isn’t often), we get to the local Vegan Potluck over at a cohousing community in Durham (If you’re interested, it’s posted via the Triangle Vegetarian and Vegan meetup).  Which, of course, means bringing something vegan.  (We don’t keep a vegan household, but I essentially have to eat vegan these days except for eggs, and we both love tasty vegan food.)

I like to bring something savory and try a new vegan sweet – this week I pulled out the artisan bread dough hanging out in the fridge and made a couple dozen rolls, and looked through some of my cookbooks to get inspiration about dessert.

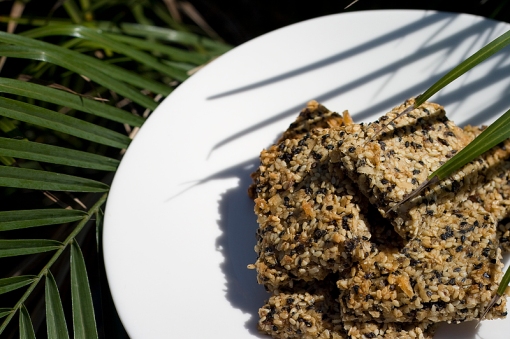
In Taste and See: Allergy Relief Cooking I found a recipe for Sesame Sticks that not only fit my incredibly ridiculous dietary requirements, but could be made vegan and looked really tasty.  Win! Turns out the only other dessert that didn’t contain soy was some Chocamole (avocado and cocoa, as well as some other stuff – it was kinda weird, but pudding-textured and chocolatey, so that was nice), so I’m glad I made something myself.

Back when I was in college, I used to work at the local mall for a company called National Health and Nutrition (dead now), a sort of GNC.  They sold, among lots of herbal supplements and vitamins and protein mixes, these fabulous little sesame cookies that weren’t crunchy but chewy, and seemingly made of nothing but sesame seeds and honey.  I LOVED those things.  Ate way too many.  Have never found them since – but this filled that niche quite nicely.  Not sure this is a good thing…

I made quite a few substitutions in this recipe, so I’ll write it up the way I made it, with notes about the original recipe.

Mmmmm.

Mmmmm.

Sesame Sticks
(adapted from Sesame Fingers, in Taste and See: Allergy Relief Cooking by Penny King)

Ingredients

1 1/4 cup coconut (I used sweetened because it’s what I had, but I think unsweetened would be better)

1/2 cup agave syrup (originally called for honey, but vegans are kind of split on that one, so I played it safe.  Plus, agave has a lower glycemic index than honey, so it fit better with the low-sugar thing I’m supposed to be doing)

1 TB vanilla

1 TB grated orange peel

1 TB cornstarch (or arrowroot)

2 1/2 cups sesame seeds (I used 2 cups plain, and 1/2 cup black sesame seeds, which have a sort of poppyseed taste – you could either use all regular sesame seeds, or use 1/2 cup poppyseeds if you don’t have black sesame seeds (available from Penzey’s, or likely your local middle-eastern shop.  I wanted the black color, thought it made them more interesting).

1/2 cup date butter*

1/2 cup tahini (could substitute peanut butter or almond butter)

1/4 tsp salt (optional – I forgot to add it and never noticed).

*date butter – heat together 1 Cup dates and 1 cup water until dates are soft; blend and cool.  Makes about 1 cup.  Store extra in fridge.

Method

This is one of those recipes with really terse instructions.  Reminds me of reading the Julie/Julia Project and how Julie’d always know she was in trouble when Julia got terse.  This cookbook was written in 1992 but has that good ol’ 1970’s feel to it, typewriter-y print and terse instructions and all.
1.  Mix all ingredients.  ‘Spread evenly on oiled cookie sheet’.

[it doesn’t specify how thick, or how big a cookie sheet, or or or…  I used one of my flat sheets and spread it about 1/2 inch thick, and it took twice as long to cook.  If you want something slightly crunchier, spread it thinner.  If you like chewy, maybe use a jelly roll pan and fill it.  Definitely oil the sheet, though. ]

2. Bake at 300F for 35-40 minutes (original recipe called for 20 minutes, but this was inadequate for all but the edges – the middle was still a gooey mess even after it had cooled.)  Will get crisp as it cools (this did not happen for me).  Cut.

These are good the day you make them, and good the day after. They likely keep well indefinitely, and probably ship well.
World Peace Cookies

World Peace Cookies

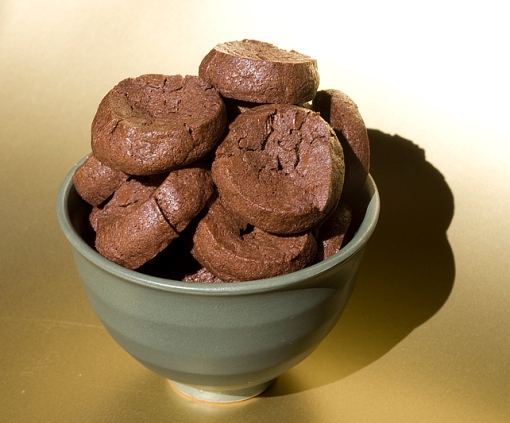
When these cookies started going around the blogosphere again, I decided to give them a try.  I’ve been thinking about a good chocolate shortbread-type cookie to use as part of a plated dessert at the cafe, so when I made them I made the rolls of dough less than an inch wide.

They turned out perfect for what I intended – they are crisp, intensely chocolately, and have a little salty hint to them that just accentuates the chocolate.  Absolutely delicious, and as small as they came out, perfect bite-size.  I’ve suggested to the cafe owner that she give one out with every drink (they’ll go with either tea or wine, I imagine), and I think she’s going to do it.  As small as I’ve made them, I can get almost eighty out of one batch of dough.  Not too shabby!

Dorie Greenspan’s World Peace Cookies
Baking: From My Home to Yours, Dorie Greenspan

1 1/4 cups all-purpose flour [I used White Lily]
1/3 cup unsweetened cocoa powder
1/2 teaspoon baking soda
1 stick plus 3 tablespoons (11 tablespoons) unsalted butter, at room temperature
2/3 cup (packed) light brown sugar
1/4 cup sugar
1/2 teaspoon fleur de sel or 1/4 teaspoon fine sea salt [I used 1/4 tsp of generic ‘fine sea salt’]
1 teaspoon vanilla extract
5 ounces bittersweet chocolate, chopped into chips, or a generous 3/4 cup store-bought mini chocolate chips [I happened to have mini chips on hand, so I used those]

Makes about 36 cookies. [or a lot, lot more if you make them tiny!  🙂  ]

Sift the flour, cocoa and baking soda together.

Working with a stand mixer, preferably fitted with a paddle attachment, or with a hand mixer in a large bowl, beat the butter on medium speed until soft and creamy. Add both sugars, the salt and vanilla extract and beat for 2 minutes more.

Turn off the mixer. Pour in the flour, drape a kitchen towel over the stand mixer to protect yourself and your kitchen from flying flour and pulse the mixer at low speed about 5 times, a second or two each time. Take a peek — if there is still a lot of flour on the surface of the dough, pulse a couple of times more; if not, remove the towel. Continuing at low speed, mix for about 30 seconds more, just until the flour disappears into the dough — for the best texture, work the dough as little as possible once the flour is added, and don’t be concerned if the dough looks a little crumbly. Toss in the chocolate pieces and mix only to incorporate.

Turn the dough out onto a work surface, gather it together and divide it in half. Working with one half at a time, shape the dough into logs that are 1 1/2 inches in diameter. [or smaller] Wrap the logs in plastic wrap and refrigerate them for at least 3 hours. (The dough can be refrigerated for up to 3 days or frozen for up to 2 months. If you’ve frozen the dough, you needn’t defrost it before baking — just slice the logs into cookies and bake the cookies 1 minute longer.)

GETTING READY TO BAKE: Center a rack in the oven and preheat the oven to 325 degrees F. Line two baking sheets with parchment or silicone mats.

Working with a sharp thin knife, slice the logs into rounds that are 1/2 inch thick. (The rounds are likely to crack as you’re cutting them — don’t be concerned, just squeeze the bits back onto each cookie.) Arrange the rounds on the baking sheets, leaving about 1 inch between them.

Bake the cookies one sheet at a time for 12 minutes [I used 10 for the little ones]— they won’t look done, nor will they be firm, but that’s just the way they should be. Transfer the baking sheet to a cooling rack and let the cookies rest until they are only just warm, at which point you can serve them or let them reach room temperature.

SERVING: The cookies can be eaten when they are warm or at room temperature.

STORING: Packed airtight, cookies will keep at room temperature for up to 3 days; they can be frozen for up to 2 months.  I can also attest from (ahem) personal experience that they’re still plenty tasty after 4 or 5 days, when kept in an airtight tin.

Unglazed cookies, prior to decorating

Unglazed cookies, prior to decorating

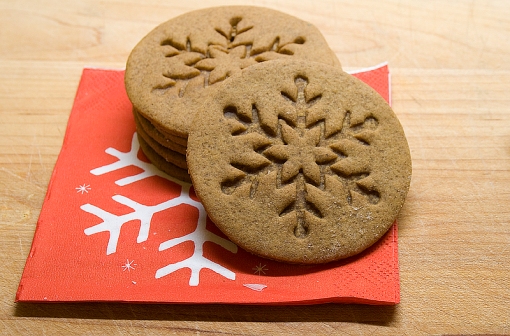
I first tried this recipe a few weeks ago, looking for an excuse to use some of my antique Springerle molds, and was blown away by it.  It’s fantastic.  It’s spicy and soft and chewy and lasts forever, and holds up in the fridge and freezer, and just.. wow! I found it via No Special Effects, who adapted it from a recipe in Tartine.

Christmas dinner?

Christmas dinner?

I’m here in Arkansas for Christmas, with my husband’s son (4.5 years old) and his parents and grandparents, and wanted to make something special for them – so brought this recipe along.  We made the dough yesterday, rolled out and baked today, and decorated while waiting for our xmas eve dinner (we fly out on the 25th, so we’re having our official ‘christmas’ tomorrow – it’s not like he can read a calendar yet, after all!).

A plate full of deliciousness

A plate full of deliciousness

I frosted some with royal icing, and Isaac helped with sprinkles and such:

The middle one says 'Isaac'. He wrote it himself.

The middle one says ‘Isaac’. He wrote it himself.

I didn’t bring my molds, and had asked my mother-in-law if she had a snowflake cutter, as I was just really jonesing to make snowflakes.  She didn’t, but when she and Isaac were at the store they found a set of Wilton cutter/imprinters that were just perfect!  You can use them with or without the cutter – they make 3″ rounds, and there’s a plunger that you can attach an imprinter to – it comes with a snowflake, a snowman, and a christmas tree.  Pretty nice!  I couldn’t find it on the web, so no pictures of the set, unfortunately.

Snowflakes in the middle; Snowmen on the edges

Snowflakes in the middle; Snowmen on the edges

Soft Glazed Gingerbread

Posted by No Special Effects, adapted from Tartine.

* 225g (2 sticks or 1 cup) unsalted butter, at room temperature
* 1 tablespoon cocoa powder
* 4 teaspoons ground ginger
* 1-1/2 teaspoons ground cloves
* 2 teaspoons ground cinnamon
* 1/2 teaspoon baking soda
* 1 teaspoon salt
* 1-1/4 teaspoon freshly ground black pepper
* 170g (3/4 cup + 2 tablespoons) granulated sugar
* 1 large egg
* 155g (1/2 cup) blackstrap or other dark molasses
* 2 tablespoons light corn syrup
* 525g (3-3/4 cups) all-purpose flour

In a large mixing bowl, add the butter, then sprinkle the cocoa, ginger, cloves, cinnamon, bakind soda, salt, and pepper evenly over it. Beat the mixture until creamy. Slowly add the granulated sugar and mix on medium speed until smooth, scraping down the sides of the bowl occasionally.

Add the egg and beat until well-combined. Add the molasses and corn syrup and beat until well-combined, scraping down the sides of the bowl as needed.

Sift all the flour over the mixture and stir in with a strong spoon or rubber spatula until well-combined and no traces of flour remain. You could also use the paddle attachment on a stand mixer, beating on low speed until the dough pulls away from the sides of the bowl and no traces of flour remain. Place the dough on a large piece of plastic wrap and press it into a rectangle about an inch thick, cover, and refrigerate overnight.

Preheat the oven to 175°C (350°F). Line a sheet pan with parchment.

If using a single springerle mold: Unwrap the dough and place on a floured work surface. Roll out the dough to 1/3 inch thickness, lightly dust the top with flour, and press the mold(s) all over the dough. Cut out the shapes with a small knife and transfer to the baking sheet, about 1 inch apart.

If using a springerle rolling pin: Lightly dust the lined sheet pan with flour and place the dough on top. Roll into a rectangle about 1/3 inch thick with a regular rolling pin, lightly dust with flour (I just brush my floury hands over the dough), then roll over it again with the patterned pin, applying enough pressure to ensure a clear impression. Trim the sides of the entire slab with a small knife, but there’s no need to cut out the individual cookies at this point.(although I did).

Bake the cookies until lightly golden along the sides but still soft to touch in the center, about 7 minutes for already-cut cookies or 15 minutes if you used a patterned rolling pin and are baking a giant slab of cookies. When done, let the cookies cool in the pan for about 10 minutes (they will set further as they cool). While waiting, prepare the glaze:

* 115g (1 cup) confectioners’ sugar
* 2-3 tablespoons water

Sift the confectioners’ sugar into a small mixing bowl. Add 2 tablespoons water and whisk until smooth. While the cookies are warm, evenly brush a light coat of glaze on top. If the details are obscured too much, whisk in the remaining tablespoon of water to the glaze and continue. If you’ve used a patterned pin to make a large slab of cookies, when the glaze has hardened, use a small, very sharp knife to cut it into the individual cookies.

Or, skip the glaze and decorate with royal icing.

[edit: The cookie cutter set I used is available here; it’s made by Wilton and is super-easy to use and clean up!]

Magic in the Middles, stacked up nice and high

Magic in the Middles, stacked up nice and high

My mother-in-law can’t have peanuts, so although she’s a wonderful cook and makes quite tasty desserts, she doesn’t make anything with peanut butter as a general rule.  Since my father-in-law loves peanut butter, I try to make and bring things for him especially every now and again.  Last month it was the Peanut Butter Crinkles; this month The Recipe Girl inspired me to make Magic in the Middles (taken from The King Arthur Flour Cookie Companion) – I mean, chocolate cookies wrapped around a peanut-butter filling?  What’s not to like? Besides, she has awesome pictures.

Finished cookie

Finished cookie

I used Demerara sugar to roll them, which gave them a pleasingly crunchy exterior.  These travelled extremely well (tossed around in our luggage to Arkansas), and are still being enjoyed.  A definite win!

Magic in the Middles

from The Recipe Girl, adapted from the KA Flour Cookie Companion

DOUGH:

1½ cups (6¼ ounces) unbleached all-purpose flour (I used White Lily)
½ cup (1½ ounces) unsweetened cocoa powder
½ tsp baking soda
¼ tsp salt
½ cup (3½ ounces) granulated sugar (plus extra for dipping, or you can use Demerara or another large-grain sugar)
½ cup (4 ounces) light brown sugar, packed
½ cup (4 ounces or 1 stick) unsalted butter
¼ cup (2 3/8 ounces) smooth peanut butter (I used Jif)
1 tsp vanilla extract
1 large egg

FILLING:
¾ cup (7 1/8 ounces) smooth peanut butter (I used Jif)
¾ cup (3 ounces) powdered sugar

1) Preheat oven to 375°F. Lightly grease (or line with parchment) two baking sheets.

2) Prepare dough: In a medium bowl, whisk together flour, cocoa, baking soda and salt. In another medium bowl, beat together sugars, butter, and peanut butter until light and fluffy. Add vanilla and egg, beating to combine, then stir in dry ingredients, blending well.

3) Prepare filling: In a small bowl, stir together peanut butter and powdered sugar until smooth. With floured hands, roll the filling into 26 one-inch balls.

4) Shape cookies: Break off about 1 Tbsp. of the dough, make an indentation in the center with your finger, and press one of the peanut butter balls into the indentation. Bring the dough up and over the filling, pressing it closed; roll the cookie in the palms of your hand to smooth it out. Repeat with remaining dough and filling.

5) Dip the top of each cookie in granulated sugar and place on prepared baking sheets about 2 inches apart. Grease the bottom of a drinking glass and use it to flatten each cookie to about ½-inch-thick.

6) Bake cookies for 7 to 9 minutes, until they’re set. Remove them from the oven and cool on a rack.

Yield: About 26 cookies

Even when I was in grad school, I had to have a holiday party centered around food.  Generally at the end of the semester, but before everyone went home.  My office-mate and I brainstormed ways to get people to come over, and hit on the idea of having a cookie-decorating party.  I mean, we both grew up in families that did cookies, but really didn’t do them for ourselves any more, and missed it.  And thus, the cookie decorating party was born.

The general idea is that we would make a bunch of undecorated holiday cookies, provide frosting and sprinkles, and let people go to town.  It’s that simple!  And it works – some people spend hours at the table, crafting marvelous masterpieces. Others slap on some frosting and sprinkles and call it a day, and retire to the other side of the room with a mug of mulled cider and chat with people over there.

Cookies wiating to be decorated

Cookies wiating to be decorated

Now that we have the Party House (the upstairs is one huge room, with a bar between the kitchen and rest of the upstairs, it’s perfect for parties), we can host more people, so I’ve been opening up the invites to more groups.  We’re members of a few meetup groups in the area, so I invited people from those.  This year we had about 30 people, all told – a good amount!

I made two additions this year to the party – first, I offered prizes for Most Creative and Most Geeky (and also ended up offering for Most Traditional and Tracey’s Choice).  Second, due to popular request, I also added an optional Cookie Exchange, the only rules of which were that NO COOKIE BE LEFT BEHIND.  (That, and that preferably your cookies were homemade).  At least a dozen people brought homemade cookies, everybody took cookies home, and at the end of the night all that was left over was a box of doughnuts someone had brought, half a box of chocolate-covered cherries, and the rest of the pies I’d put out.  Not a bad deal!

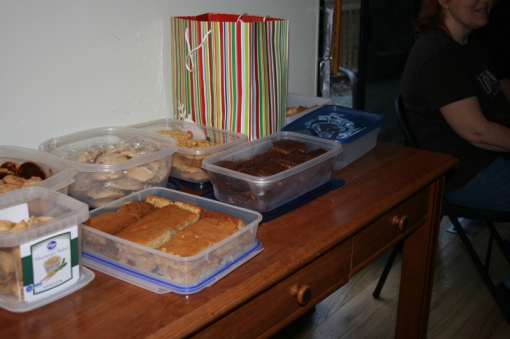
The cookie exchange table, early in the evening

The cookie exchange table, early in the evening

You can see some of the offerings, here.

Closer....

Closer….

And a closer look – those brownies off to the right?  They had CANDY BARS baked into them.  Oh my gosh.  They were tasty.

I just realized that I totally failed to take pictures of my macaroons!  Dangit, and those were a ton of work, too.  And tasty.  (From the Field Guide to Cookies, by Anita Chu).

So, on to the winners!

Most Geeky Cookie:

Most Geeky

Most Geeky

If you look closely, you’ll see that someone took two boot cookies and made them into a Game Controller.  There was a voting tie between that and the Dalek Cookie (see Most Traditional), but it was felt that the novel use of two cookies smushed together took it. The prize for this cookie was the amazing Bonsai Potato Kit!

Bonsai Potato!

Bonsai Potato!

Most Creative Cookie:

Most Creative Cookie, with finger paints!

Most Creative Cookie, with finger paints!

We never did get a great picture of this one – but it’s a totally hippie tie-die stocking, with sprinkles and everything.  The prize for this one was a jar of glow-in-the-dark finger paints.

Most traditional:

The most traditional... but wait, what's that?

The most traditional… but wait, what’s that?

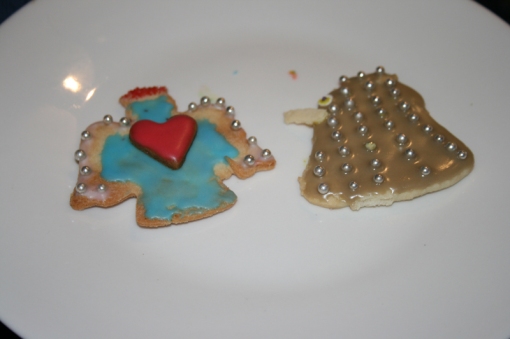
The judges felt overwhelmingly that this beautiful angel (made with stacking cookies, no less) deserved the prize for most traditional Christmas cookie (a bag of apple cider caramels from SugarPunk) – but wait!  As you can see, the poor angel is being menaced by a Dalek!  Oh noes!

the lovely creator of the angel and Dalek, with her caramels

the lovely creator of the angel and Dalek, with her caramels

The prizes had been awarded, but there was still one cookie that was just so amazingly cool that I had to make up a prize to give it.

Star-bellied Sneetch!

Star-bellied Sneetch!

I mean – it’s Dr. Seuss!  How cool is that.  I fell in love with it.

)

A delicious Cookie… and a star-bellied sneetch. 🙂

So she got the bag of Fleur de Sel Caramels.

Later, however, we noticed something… unusual… about the cookie.

Um... zombie sneetch?

zombie sneetch?

The dark discolorations…  the glassy stare…

O NO, ZOMBIE COOKIE!!!!!11!11!!!!

We ate it.  It was to save ourselves.  It was tasty.
I can’t let you go without mentioning one last batch of awesome cookies, from the brush of the talented Heather:

Ghosties!

And a closeup:

Ghosts! and a box thingie

Ghosts! and a box thingie

I am informed that if you play video games, this one makes more sense.  There was a pac man cookie, as well, who was menacing the ghosts – but we ate him too.

One last batch...

One last batch…

After we were all done with cookies, and some people had gone home, the evening devolved into a few hours of Evil Uno (like regular Uno, with two simple rules modifications:  Draw until you can play; and Draw Fours are a legal follow to a Draw Two.  I think the most anyone had to draw at one time was fourteen.)

Tons of fun – can’t wait until next year!

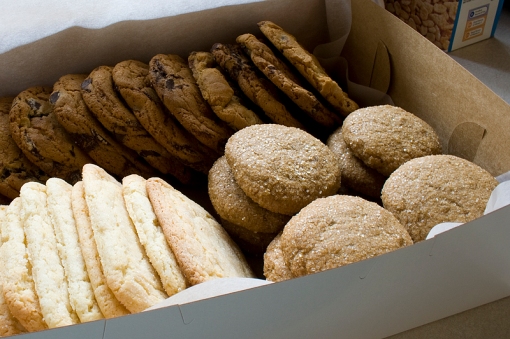
So, last week there was that spontaneous order for cookies from my bank manager.  Finally, there are pictures!

Box of Cookies

Box of Cookies

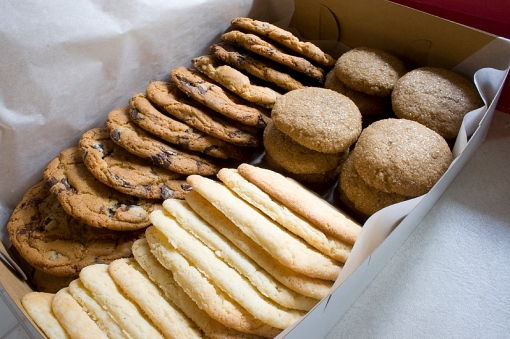
In the back, a dozen Giant Chocolate Chip Cookies.  Front and left, Old Fashioned Sugar Cookies (from Maida Heatter’s Book of Great Cookies), and front and right, Spicy, Chewy Molasses Cookies.

(Just a reminder, you can order all of these tasty cookies here!)

I’m telling you, this box smelled so good it almost didn’t make it out the door…

Holiday cookies all snuggled up in their beds...

Holiday cookies all snuggled up in their beds…

Okay, here’s the request – back when I never made rolled-out-cookies (too much work!), I occasionally would find the perfect christmas cookie – they came out light in color, tender yet firm in texture (the arms and legs didn’t break off, but they weren’t tough either), and the flavor was incredibly rich and sweet without being too sweet.  I’m guessing that they maybe had cream cheese in the dough, but I can’t be sure.

Any suggestions as to where I should start?  There are a million recipes out there!  What’s your favorite to gussie up and decorate?

Or, When Things Don’t Quite Turn Out.

That’s right, I share with you my failures as well! Well, some of them. The photogenic ones.

The original source for this recipe was BakingBlonde‘s lovely post on the topic. I mean, look at those pictures? Who wouldn’t want to make these cookies?? I don’t even like peanut butter, and I still thought they looked awesome, so I gave it a shot (plenty of other people like them, and it’s always a struggle to find recipes that aren’t dry as bones).

In the beginning, all looked well:

Beautiful raw cookie dough

Beautiful raw cookie dough

(They’re sprinkled with powdered sugar because this dough just <b> drank</b> up the powdered sugar I’d rolled them in, and I wanted my crackly crust.)

It wasn’t until I checked on them near the end of baking time that disaster struck. Instead of lovely, high cookies with deep crinkles, I had this:

Flat, flat, flat cookies

Flat, flat, flat cookies

Well, the crinkles are there, but they were oh so very flat. Extremely flat. Still tasty, if PB cookies are your thing – they were moist and delicious, and held up at my in-laws’ house for over a week (I don’t know how they do it). And I bet they’d be really great with some chocolate ganache sandwiched between two of them. But still, not what I was going for.

This recipe made a lot of dough, so I’d rolled and frozen the other 3/4ths of it. I decided to give them a second chance. Cut off the rolls, dropped the pieces into powdered sugar, and popped into the oven. This time, they came out higher, but drier (the dough had obviously done what PB cookie dough likes to do and hidden away all of the moisture while it was resting in the freezer). Still nothing like BB’s lovely pictures.

Ah, well, the search continues. Anyone have a PB cookie recipe they’d love to find at their local coffee shop?

The Recipe:

From BakingBlonde‘s grandmother, among other sources

Peanut Butter Crinkle Cookies
1 cup butter
1 cup creamy peanut butter
1 cup brown sugar
1 cup sugar
2 eggs (room temperature)
2 tsps vanilla extract
2 1/2 cups flour
1 tsp baking powder
1 tsp baking soda
1/2 tsp salt
1 cup powdered sugar (or more as needed for rolling)

Preheat oven to 350.
Line baking sheets with parchement paper.
Place powdered sugar in shallow bowl.
In a large mixing bowl, cream together the butter and peanut butter. Once combined beat in the white sugar, and brown sugar until well blended. Beat in the eggs and vanilla.
In a large bowl wisk together the flour, baking powder, baking soda and salt. Gently add to creamed mixture and mix until almost combined.
Chill dough for 10-20 minutes.
Roll tablespoonfuls of dough into balls. Genlty roll the dough balls into powdered sugar and place dough balls on parchment lined baking sheets. Carefully press down on each ball with a glass to flatten tops slightly.
Bake for 10-12 minutes in the preheated oven, or until top is crinkley and edges are set. Cook on sheet for 10 minutes and transfer to baking rack to finish cooling.

I, like many others, have a ‘favorite’ chocolate chip cookie recipe.  Well, to be precise, *two* favorites – one for when I just want a whole mess ‘o delicious little chocolate chippers (Nestle’s Tollhouse recipe, scooped small and made with dark brown sugar instead of light), and the other for when I want a large, chunky handful of chocolate chip goodness (Desaulnier’s Mrs D’s cookie recipe).  So I wasn’t really looking to try another recipe, but when the NYT did their cookie cook-off and selected Jacques Torres’ recipe, I had to give it a try.

The NYT Chocolate Chip Cookie

The NYT Chocolate Chip Cookie

I made a substitution in the chocolate called for – I have really good semisweet callets on hand, but at the price they go for, they’d price this cookie right out of contention for the business.  So I used Ghirardelli’s chocolate chips instead, and I don’t think it detracted from the final product in any way, I have to say.  I’ve also tried the recipe using the original flours called for (cake and bread), and once with Lily’s all-purpose (a nice soft flour), and the difference was undetectable – so save some time!

There are two big deals about this recipe that really take the choc chip cookie up a notch – the first is the notion of aging the dough for 36 hours after you make it, but before baking it.  As many others have done, I tested it fresh and aged, and wow – the difference is truly striking.  The flavors deepen and meld together wonderfully.

The second is the addition of a sprinkle of sea salt on the top right before baking, and that hint of extra saltiness really sets off the chocolate flavors.

The cookies themselves come out huge – at least 5 inches across – with crisp outer edges, making way for a delightfully soft and chewy interior.

Let’s have a closeup:

The NYT Chocolate Chip Cookie up close and personal

The NYT Chocolate Chip Cookie up close and personal

You can see the glint of the little salt crystals – yum!

The dough freezes like a dream, although next time I’d go to the bother of chilling it a little first, then rolling into logs – it would make carving out 3.5 ounce chunks much easier!  Wrap well and keep away from “mice” who may nibble at it while it’s in the freezer (a perennial problem at our house), possibly by hiding it underneath a bag of vegetables.  I only needed to add 2 minutes to the cooking time when using dough straight from the freezer.

Definitely adding this to the arsenal – it beats out Mrs. D’s on its texture combinations- both crunchy and chewy, and matches it in richness of flavor.  Not to mention, it’s less expensive to make!

Suggested serving: With a nice cup of coffee or tea, preferably in front of a toasty fireplace.

Pumpkins!

Pumpkin Patch Party Cakes

Autumn is well upon us, even in the South, although it looks different than what I’m used to. The leaves don’t so much turn colors as just fall off the tree (although they are as equally efficacious at clogging up gutters as their northern counterparts), and during the day the temperatures still climb into the 80s on a regular basis – but at night there’s a chill in the air, and the morning ride into work is a brisk one. The farmer’s markets are starting to show mostly autumn produce – squashes, the last of the leafy vegetables, etc. Which means one thing – pumpkins!

I picked up a few baking pumpkins at Trader Joe’s (the local farmer’s market being out of them by the time I dragged myself out of bed on Saturday), and roasted them up to use in various things. I’ve been steaming them rather than straight-up roasting – making a foil tent and putting some water into the bottom of the pan. I find that it’s much faster (takes only half an hour for a medium-sized pumpkin), but that you don’t get those lovely little caramelized bits at the edges. Still tasty, though, at least as much as the canned stuff.

The first thing on my list that I’ve been waiting to try out was a cute little recipe for pumpkin-shaped pumpkin cupcakes (found in Southern Lady magazine, Sept/Oct 2008 – Southern Lady has some really nice dessert content – there are always a few recipes per issue that I want to bake!). Not having a mini-bundt pan, I’d been looking around and ended up getting a mini-kugelhof pan, which is a little narrower at top. And, also, takes less batter – I’d filled the hollows about 2/3 full and had quite a bit of over-spillage at the top. The trimmings were usually as big as cookies themselves – perfect for sandwiching together with some extra frosting!

Pumpkin-top "Sandwiches"

Waste not, want not - Pumpkin-top "Sandwiches"

I also had plenty of batter left over for trying out my new silicon muffin pan, so there really ended up quite the pumpkin extravaganza, as you can see:

The Harvest (plus some NYT chocolate chip cookies, yum!)

The Harvest (plus some NYT chocolate chip cookies, yum!)

And now, the Party Pumpkins!

Pumpkin Patch Party Cakes
Yield:
6.00 servings

Ingredients

  • Nonstick cooking spray
  • 2 ¼ cups all-purpose flour
  • 1 ½ teaspoons pumpkin pie spice
  • 1 ½ teaspoons baking powder
  • ¾ teaspoon salt
  • ½ teaspoon baking soda
  • ¾ cup (1 ½ sticks) unsalted butter, softened
  • ¾ cup packed brown sugar (I used light)
  • ¾ cup granulated suar
  • 3 large eggs
  • 1 (15-ounce) can LIBBY’S 100% Pure Pumpkin (I used my own home-roasted pumpkin puree, yum)
  • ¾ teaspoon vanilla extract
  • 1 recipe Orange Cream Cheese Icing
  • Garnish= 6 (4-inch) cinnamon sticks (I used chocolate-dipped Vanilla Stix, but you could totally use chocolate-dipped Pumpkin Pocky) Orange Cream Cheese Icing:
  • (Makes about 1 cup)
  • 1 (8-ounce) package cream cheese, at room temperature
  • ½ teaspoon orange extract
  • 1 cup powdered sugar
  • 2 tablespoons milk

Directions

Preheat oven to 350F. Spray two 6-cavity mini-fluted tube pans with nonstick cooking spray.

Combine flour, pumpkin pie spices, baking powder, salt, and baking soda in medium bowl. Beat butter and sugars in large mixing bowl for 3 to 4 minutes, or until creamy.

Add eggs, beat well.

Add pumpkin and vanilla extract, beat well.

Gradually beat in flour mixture (do not overmix! Just mix until wet.) Spoon evenly into prepared cavities (about ½ cup batter in each). [Note: Here I used a pastry bag and piped the dough in – less mess, and easier to get consistent levels and layers of filling] Gently tap pan on counter to release air bubbles.

Bake for 20 minutes, or until wooden toothpick inserted in cakes comes out clean. Cool in pans on wire racks 10 minutes; invert onto wire racks ot cool completely. With serrated knife, carefully cut off bottoms of each cake so surface is level/flat. (Tip: save the bottoms to enjoy later – and did I!)

Prepare Orange Cream Cheese Icing.

Spread 1 tablespoon icing over cut side of cake to within ½ inch of edge on your 6 uglier cakelingsot to avoid the edge, therefore cream cheese ‘bulge’. Oops] Reserve remaining icing. Place the 6 uniced cakes on top of cakes with icing, making cute little pumpkins. (Save the nicer ones for toppers); be sure to spread mixture over hole in center. [You’ll note that I totally forgot this step, hence a little frosting ‘bulge’ – oops.]

To serve: thin remaining icing by adding 2 Tablespoons milk; beat until smooth. the consistency should be thin enough to drizzle; add more milk as needed. Drizzle over cakes. Garnish with one cinnamon stick (or pocky) “stem” in the center of each “pumpkin”.

[At this point, I also sprinkled a little nutmeg on the top; cardamom would also be nifty.]

Construction was uneventful, although I did forget to keep the frosting contained (so there’s a visible layer between the top and bottom of the pumpkin, oops). I opted to forgo the cinnamon stick (as inedible) to serve as the stem, instead coating shards of vanilla stix (link) in chocolate and using those (although Pocky would work equally as well, and now they make pumpkin pocky! Win-win, there.). A little sprinkle of nutmeg over the glaze finishes it off for the pumpkins – I used cardamom on the cupcakes, which melded nicely with the other spices and pumpkin flavor. The orange in the glaze really worked well with the pumpkin – I usually find powdered-sugar based glazes too sweet, but just a little hint of citrus cuts that.

The pumpkin cake recipe itself was perfect – good pumpkin flavor, good crumb, without being too wet (although the cupcakes took longer to cook than usual – perhaps something to do with the silicon baking pan?). I’ll definitely use it again.

Cute and tasty! These disappeared quickly.