Unglazed cookies, prior to decorating

Unglazed cookies, prior to decorating

I first tried this recipe a few weeks ago, looking for an excuse to use some of my antique Springerle molds, and was blown away by it.  It’s fantastic.  It’s spicy and soft and chewy and lasts forever, and holds up in the fridge and freezer, and just.. wow! I found it via No Special Effects, who adapted it from a recipe in Tartine.

Christmas dinner?

Christmas dinner?

I’m here in Arkansas for Christmas, with my husband’s son (4.5 years old) and his parents and grandparents, and wanted to make something special for them – so brought this recipe along.  We made the dough yesterday, rolled out and baked today, and decorated while waiting for our xmas eve dinner (we fly out on the 25th, so we’re having our official ‘christmas’ tomorrow – it’s not like he can read a calendar yet, after all!).

A plate full of deliciousness

A plate full of deliciousness

I frosted some with royal icing, and Isaac helped with sprinkles and such:

The middle one says 'Isaac'. He wrote it himself.

The middle one says ‘Isaac’. He wrote it himself.

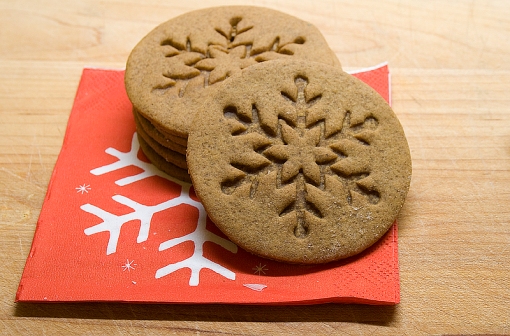
I didn’t bring my molds, and had asked my mother-in-law if she had a snowflake cutter, as I was just really jonesing to make snowflakes.  She didn’t, but when she and Isaac were at the store they found a set of Wilton cutter/imprinters that were just perfect!  You can use them with or without the cutter – they make 3″ rounds, and there’s a plunger that you can attach an imprinter to – it comes with a snowflake, a snowman, and a christmas tree.  Pretty nice!  I couldn’t find it on the web, so no pictures of the set, unfortunately.

Snowflakes in the middle; Snowmen on the edges

Snowflakes in the middle; Snowmen on the edges

Soft Glazed Gingerbread

Posted by No Special Effects, adapted from Tartine.

* 225g (2 sticks or 1 cup) unsalted butter, at room temperature
* 1 tablespoon cocoa powder
* 4 teaspoons ground ginger
* 1-1/2 teaspoons ground cloves
* 2 teaspoons ground cinnamon
* 1/2 teaspoon baking soda
* 1 teaspoon salt
* 1-1/4 teaspoon freshly ground black pepper
* 170g (3/4 cup + 2 tablespoons) granulated sugar
* 1 large egg
* 155g (1/2 cup) blackstrap or other dark molasses
* 2 tablespoons light corn syrup
* 525g (3-3/4 cups) all-purpose flour

In a large mixing bowl, add the butter, then sprinkle the cocoa, ginger, cloves, cinnamon, bakind soda, salt, and pepper evenly over it. Beat the mixture until creamy. Slowly add the granulated sugar and mix on medium speed until smooth, scraping down the sides of the bowl occasionally.

Add the egg and beat until well-combined. Add the molasses and corn syrup and beat until well-combined, scraping down the sides of the bowl as needed.

Sift all the flour over the mixture and stir in with a strong spoon or rubber spatula until well-combined and no traces of flour remain. You could also use the paddle attachment on a stand mixer, beating on low speed until the dough pulls away from the sides of the bowl and no traces of flour remain. Place the dough on a large piece of plastic wrap and press it into a rectangle about an inch thick, cover, and refrigerate overnight.

Preheat the oven to 175°C (350°F). Line a sheet pan with parchment.

If using a single springerle mold: Unwrap the dough and place on a floured work surface. Roll out the dough to 1/3 inch thickness, lightly dust the top with flour, and press the mold(s) all over the dough. Cut out the shapes with a small knife and transfer to the baking sheet, about 1 inch apart.

If using a springerle rolling pin: Lightly dust the lined sheet pan with flour and place the dough on top. Roll into a rectangle about 1/3 inch thick with a regular rolling pin, lightly dust with flour (I just brush my floury hands over the dough), then roll over it again with the patterned pin, applying enough pressure to ensure a clear impression. Trim the sides of the entire slab with a small knife, but there’s no need to cut out the individual cookies at this point.(although I did).

Bake the cookies until lightly golden along the sides but still soft to touch in the center, about 7 minutes for already-cut cookies or 15 minutes if you used a patterned rolling pin and are baking a giant slab of cookies. When done, let the cookies cool in the pan for about 10 minutes (they will set further as they cool). While waiting, prepare the glaze:

* 115g (1 cup) confectioners’ sugar
* 2-3 tablespoons water

Sift the confectioners’ sugar into a small mixing bowl. Add 2 tablespoons water and whisk until smooth. While the cookies are warm, evenly brush a light coat of glaze on top. If the details are obscured too much, whisk in the remaining tablespoon of water to the glaze and continue. If you’ve used a patterned pin to make a large slab of cookies, when the glaze has hardened, use a small, very sharp knife to cut it into the individual cookies.

Or, skip the glaze and decorate with royal icing.

[edit: The cookie cutter set I used is available here; it’s made by Wilton and is super-easy to use and clean up!]

Magic in the Middles, stacked up nice and high

Magic in the Middles, stacked up nice and high

My mother-in-law can’t have peanuts, so although she’s a wonderful cook and makes quite tasty desserts, she doesn’t make anything with peanut butter as a general rule.  Since my father-in-law loves peanut butter, I try to make and bring things for him especially every now and again.  Last month it was the Peanut Butter Crinkles; this month The Recipe Girl inspired me to make Magic in the Middles (taken from The King Arthur Flour Cookie Companion) – I mean, chocolate cookies wrapped around a peanut-butter filling?  What’s not to like? Besides, she has awesome pictures.

Finished cookie

Finished cookie

I used Demerara sugar to roll them, which gave them a pleasingly crunchy exterior.  These travelled extremely well (tossed around in our luggage to Arkansas), and are still being enjoyed.  A definite win!

Magic in the Middles

from The Recipe Girl, adapted from the KA Flour Cookie Companion

DOUGH:

1½ cups (6¼ ounces) unbleached all-purpose flour (I used White Lily)
½ cup (1½ ounces) unsweetened cocoa powder
½ tsp baking soda
¼ tsp salt
½ cup (3½ ounces) granulated sugar (plus extra for dipping, or you can use Demerara or another large-grain sugar)
½ cup (4 ounces) light brown sugar, packed
½ cup (4 ounces or 1 stick) unsalted butter
¼ cup (2 3/8 ounces) smooth peanut butter (I used Jif)
1 tsp vanilla extract
1 large egg

FILLING:
¾ cup (7 1/8 ounces) smooth peanut butter (I used Jif)
¾ cup (3 ounces) powdered sugar

1) Preheat oven to 375°F. Lightly grease (or line with parchment) two baking sheets.

2) Prepare dough: In a medium bowl, whisk together flour, cocoa, baking soda and salt. In another medium bowl, beat together sugars, butter, and peanut butter until light and fluffy. Add vanilla and egg, beating to combine, then stir in dry ingredients, blending well.

3) Prepare filling: In a small bowl, stir together peanut butter and powdered sugar until smooth. With floured hands, roll the filling into 26 one-inch balls.

4) Shape cookies: Break off about 1 Tbsp. of the dough, make an indentation in the center with your finger, and press one of the peanut butter balls into the indentation. Bring the dough up and over the filling, pressing it closed; roll the cookie in the palms of your hand to smooth it out. Repeat with remaining dough and filling.

5) Dip the top of each cookie in granulated sugar and place on prepared baking sheets about 2 inches apart. Grease the bottom of a drinking glass and use it to flatten each cookie to about ½-inch-thick.

6) Bake cookies for 7 to 9 minutes, until they’re set. Remove them from the oven and cool on a rack.

Yield: About 26 cookies

Bourbon Balls

Bourbon Balls

One of the things I love about food and desserts is that they can so strongly link us to certain places and times.  Pumpkin pie is Thanksgiving, as is Green Bean Casserole, at least the Thanksgiving of my childhood.  Nowadays I’m spending Thanksgivings in the South, and there seems to be a lack of appreciation for this traditional dish down here.  It’s alright; I’ve come to appreciate the sweet potato casserole that my mother-in-law makes, with the pralined pecan topping (utterly delicious), even if I still don’t really get it about cornbread.

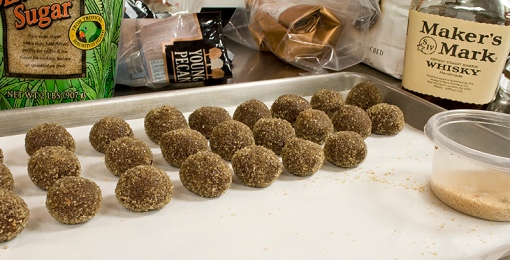
One of the desserts that I’ve come to associate with Christmas is these Bourbon Balls.  They’re something my mother-in-law also usually makes, and they’re little spheres of heaven.  Crunchy on the outside from the demerara sugar, dense and sugary and boozy on the inside.  One can last you for ten minutes, at least.  They’re not really something you just pop into your mouth.  You take nibbles.  You savor.

Making them is a very simple process, at least it is with a food processor.  I spent years and years without one, or the past few years with a very small (2-3 cup) processor, doing crumbs in batches.  This year, the bourbon balls took all of about ten minutes to put together, and another 10-15 to scoop and roll in sugar.  The payoff, though?  A whole lotta tasty bourbon goodness. Yum.

Bourbon Balls

Adapted from the Williamsburg Cookbook

8 oz semisweet chocolate, finely chopped
60 Nilla Wafers (about 8 oz)
1 cup finely chopped pecans
3/4 cup granulated sugar
1/2 cup bourbon (I used Maker’s Mark)
1/4 cup light corn syrup

Raw or Demerara Sugar for rolling

Melt chocolate over boiler or nuke it.

Grind nilla wafers in food processor.  Add pecans and sugar, pulse several times.  Pour into large bowl.  Add chocolate, bourbon, corn syrup, and stir to mix thoroughly.

All mixed together, waiting to be made into balls

All mixed together, waiting to be made into balls

Form into balls (I used a #50 scoop), roll in sugar, chill to set.  Makes zillions (about 60)

Not quite halfway through rolling...

Not quite halfway through rolling…

These, along with Vanilla Sugar‘s Spicy Chocolate Fudge with Pecans (which, while not terribly spicy, was very tasty nonetheless) and some leftover caramels, made up my holiday boxes this year. Yum!

SugarPunk was originally started to provide desserts and baked goods to a newly-opening coffee and wine bar in Sanford, Steele St. Cafe & Wine Bar.  Well, that was back in October, and with one thing and another, it’s still not open (although there is hope that it will do so soon!).  Meanwhile, I’ve rent on the kitchen to pay, and all of the permit and licensing and business registration fees to pay, and equipment to purchase, etc. so I’ve been busy looking around to figure out how to bring some money in (rather than watch it all walking away, or perhaps flying away…)

Expanding into doing special orders and an online store was always in the works, it’s just been pushed up a little.  Hence the online store-front, and the fall menu.  Business via those has been pretty slow – it takes a while to get the word out!  Most of my orders so far have been from friends and family – but hey, it’s income!  And I get to bake for people I love – what’s not to like about that?

I’ve also been discovering the joys of serendipity.  The other day, I got a phone message from a friend.  “I just ran into so-and-so from [cafe X], and they’re looking for someone to do desserts, so she was really interested in talking to you, you should give her a call asap!”  This ended up being a small restaurant that does some baked goods, but continually gets requests for custom cakes or other desserts, and would like to refer people to a locally-owned business.  I took them some slices of leftover thanksgiving desserts (carrot cake, pumpkin cheesecake) and a donut muffin, and she took a bunch of business cards and a fall menu and promised to refer people my way.  Awesome!

Yesterday was even more serendipitous.  I stopped in to my bank to go ahead and open a business checking account.  While I was waiting for someone to be available, I chatted with one of the managers about the business and gave him a card.  I then went in to go through the laborious process of opening yet another account and linking it to the old accounts, etc. etc., and towards the end of that he walked into the office, handed me $40 in cash, and said, “I’d like to order a dozen sugar cookies, a dozen molasses cookies, and a dozen chocolate chip cookies, when can I have them?”  I sounded him out a little more, and then he told me that if I could have them there by 5pm on Friday, he’d take them to the company holiday party and would put a stack of business cards with them.

“Done deal!” I said. I don’t work on Fridays, so I can spend the morning baking.

Currently, I still need to do more marketing.  I’ve put together a lovely Holiday Catalog, but getting it printed has turned into something of a slog (curse you, Open Office and your ‘your picture bores me, I’m going to randomly insert a pointing finger into it’  (I am NOT MAKING THIS UP)).  I’ve also come up with the guidelines and pricing for a Dessert of the Month club, and should probably get that publicized so people can get it as gifts for their hard-to-please sweet-tooth relatives who already have too much stuff.

Still haven’t broken even yet, but I gave myself a year to do that, so I’m trying not to be hard on myself. And I’m still loving the baking.  So that’s a plus.  Now, if only I could get enough orders that I didn’t feel I needed to keep the day job…

Pumpkins!

Pumpkin Patch Party Cakes

Autumn is well upon us, even in the South, although it looks different than what I’m used to. The leaves don’t so much turn colors as just fall off the tree (although they are as equally efficacious at clogging up gutters as their northern counterparts), and during the day the temperatures still climb into the 80s on a regular basis – but at night there’s a chill in the air, and the morning ride into work is a brisk one. The farmer’s markets are starting to show mostly autumn produce – squashes, the last of the leafy vegetables, etc. Which means one thing – pumpkins!

I picked up a few baking pumpkins at Trader Joe’s (the local farmer’s market being out of them by the time I dragged myself out of bed on Saturday), and roasted them up to use in various things. I’ve been steaming them rather than straight-up roasting – making a foil tent and putting some water into the bottom of the pan. I find that it’s much faster (takes only half an hour for a medium-sized pumpkin), but that you don’t get those lovely little caramelized bits at the edges. Still tasty, though, at least as much as the canned stuff.

The first thing on my list that I’ve been waiting to try out was a cute little recipe for pumpkin-shaped pumpkin cupcakes (found in Southern Lady magazine, Sept/Oct 2008 – Southern Lady has some really nice dessert content – there are always a few recipes per issue that I want to bake!). Not having a mini-bundt pan, I’d been looking around and ended up getting a mini-kugelhof pan, which is a little narrower at top. And, also, takes less batter – I’d filled the hollows about 2/3 full and had quite a bit of over-spillage at the top. The trimmings were usually as big as cookies themselves – perfect for sandwiching together with some extra frosting!

Pumpkin-top "Sandwiches"

Waste not, want not - Pumpkin-top "Sandwiches"

I also had plenty of batter left over for trying out my new silicon muffin pan, so there really ended up quite the pumpkin extravaganza, as you can see:

The Harvest (plus some NYT chocolate chip cookies, yum!)

The Harvest (plus some NYT chocolate chip cookies, yum!)

And now, the Party Pumpkins!

Pumpkin Patch Party Cakes
Yield:
6.00 servings

Ingredients

  • Nonstick cooking spray
  • 2 ¼ cups all-purpose flour
  • 1 ½ teaspoons pumpkin pie spice
  • 1 ½ teaspoons baking powder
  • ¾ teaspoon salt
  • ½ teaspoon baking soda
  • ¾ cup (1 ½ sticks) unsalted butter, softened
  • ¾ cup packed brown sugar (I used light)
  • ¾ cup granulated suar
  • 3 large eggs
  • 1 (15-ounce) can LIBBY’S 100% Pure Pumpkin (I used my own home-roasted pumpkin puree, yum)
  • ¾ teaspoon vanilla extract
  • 1 recipe Orange Cream Cheese Icing
  • Garnish= 6 (4-inch) cinnamon sticks (I used chocolate-dipped Vanilla Stix, but you could totally use chocolate-dipped Pumpkin Pocky) Orange Cream Cheese Icing:
  • (Makes about 1 cup)
  • 1 (8-ounce) package cream cheese, at room temperature
  • ½ teaspoon orange extract
  • 1 cup powdered sugar
  • 2 tablespoons milk

Directions

Preheat oven to 350F. Spray two 6-cavity mini-fluted tube pans with nonstick cooking spray.

Combine flour, pumpkin pie spices, baking powder, salt, and baking soda in medium bowl. Beat butter and sugars in large mixing bowl for 3 to 4 minutes, or until creamy.

Add eggs, beat well.

Add pumpkin and vanilla extract, beat well.

Gradually beat in flour mixture (do not overmix! Just mix until wet.) Spoon evenly into prepared cavities (about ½ cup batter in each). [Note: Here I used a pastry bag and piped the dough in – less mess, and easier to get consistent levels and layers of filling] Gently tap pan on counter to release air bubbles.

Bake for 20 minutes, or until wooden toothpick inserted in cakes comes out clean. Cool in pans on wire racks 10 minutes; invert onto wire racks ot cool completely. With serrated knife, carefully cut off bottoms of each cake so surface is level/flat. (Tip: save the bottoms to enjoy later – and did I!)

Prepare Orange Cream Cheese Icing.

Spread 1 tablespoon icing over cut side of cake to within ½ inch of edge on your 6 uglier cakelingsot to avoid the edge, therefore cream cheese ‘bulge’. Oops] Reserve remaining icing. Place the 6 uniced cakes on top of cakes with icing, making cute little pumpkins. (Save the nicer ones for toppers); be sure to spread mixture over hole in center. [You’ll note that I totally forgot this step, hence a little frosting ‘bulge’ – oops.]

To serve: thin remaining icing by adding 2 Tablespoons milk; beat until smooth. the consistency should be thin enough to drizzle; add more milk as needed. Drizzle over cakes. Garnish with one cinnamon stick (or pocky) “stem” in the center of each “pumpkin”.

[At this point, I also sprinkled a little nutmeg on the top; cardamom would also be nifty.]

Construction was uneventful, although I did forget to keep the frosting contained (so there’s a visible layer between the top and bottom of the pumpkin, oops). I opted to forgo the cinnamon stick (as inedible) to serve as the stem, instead coating shards of vanilla stix (link) in chocolate and using those (although Pocky would work equally as well, and now they make pumpkin pocky! Win-win, there.). A little sprinkle of nutmeg over the glaze finishes it off for the pumpkins – I used cardamom on the cupcakes, which melded nicely with the other spices and pumpkin flavor. The orange in the glaze really worked well with the pumpkin – I usually find powdered-sugar based glazes too sweet, but just a little hint of citrus cuts that.

The pumpkin cake recipe itself was perfect – good pumpkin flavor, good crumb, without being too wet (although the cupcakes took longer to cook than usual – perhaps something to do with the silicon baking pan?). I’ll definitely use it again.

Cute and tasty! These disappeared quickly.