What, you say? No pumpkiny goodness? What about the pumpkins?

Later, later. All in good time. For now, we move on to that great southern delicacy, sweet potato pie.

Buttermilk Sweet Potato Pie with fall colour

Buttermilk Sweet Potato Pie with fall colour

So, I grew up in the Midwest, and although my mom’s side are from Kentucky and I grew up eating plenty of southern-derived dishes, when it came time for Thanksgiving, it was pumpkin pie all the way.

Now that I live in the South, I figured I should give sweet potato pie a try – I mean, how different could it be? Nicole at Baking Bites had posted a recipe recently for Buttermilk Sweet Potato Pie that looked terrific, so I gave it a whirl! Notes on what I thought about it after the recipe…

Buttermilk Sweet Potato Pie

1 cup cooked, pureed sweet potato
1 cup buttermilk
1/4 tsp ground nutmeg
1/4 tsp salt
2 tsp vanilla extract
3/4 cup brown sugar
3 large eggs
2 tbsp all purpose flour
1 9 or 10-inch graham cracker pie crust [I replaced with a regular pie crust, partially pre-baked, using my favorite pie crust recipe. Some day, I’ll post that, but not today 🙂 ]

Preheat oven to 350F.
Press sweet potato puree through a wire strainer to make it as smooth as possible, adding a tablespoon or two of water if you are working with leftover potatoes to make them a bit more pliable.

[note: Nicole had mentioned that it was difficult to get homemade puree as smooth as store-bought, but I cooked it down and then pureed the heck out of it with the immersion blender, my favorite whirly blades of death tool I own, and it was totally smooth, so YMMV]

In the bowl of a mixer, combine all ingredients except the flour and mix until smooth. Add in flour and mix until incorporated.

Place the pie crust on a baking sheet and place baking sheet on the middle rack of a preheated oven. Pour filling into pie crust (it is thin enough that it will slosh if you put it in the pie crust and attempt to carry it over to the oven).

Bake for 50-55 minutes, until pie is set and jiggles only very slightly when the pan is bumped.
Cool on a wire rack to room temperature. Refrigerate for at least 2 hours, or overnight, before serving.

Serves 10

So, I tried a tiny little slice before sending it off to work with Jeff. “Is this how it’s supposed to taste?”, I asked him. He tried a little bit and allowed that, given that he didn’t like sweet potato pie and so hadn’t eaten any in decades, it tasted just like he remembered although the buttermilk gave it a nice tanginess.

The comments from his coworkers seemed to indicate that this was, indeed, a perfectly acceptable representative of the species (in fact, they loved it).

My verdict? Sure isn’t replacing pumpkin pie in this house. It had this weird sort of gummy starchy mouth-feel to it – like you’d made a pie with potatoes. Which we had, really. It made these weird little bubbles on the surface, as well, although they didn’t seem to be related to texture at all. Not sure what was up with that.

The flavor was really nice – the sweet potato and buttermilk played together very nicely, and the crust, as usual, was perfect. But really, not my thing.

Weird little bubbles. Pretty leaves.

Weird little bubbles. Pretty leaves.

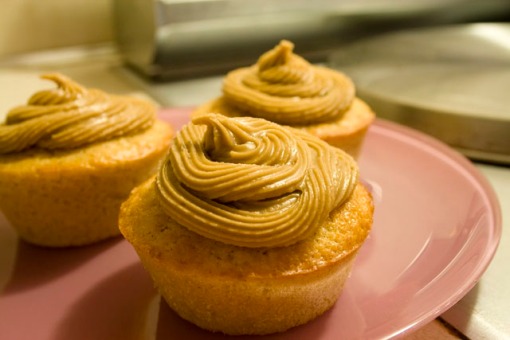
Apple Cider Cupcakes with Caramel Frosting

Apple Cider Cupcakes with Caramel Frosting

It’s fall, right? I thought I’d give the pumpkin a break for a bit and try the other fall favorite, apple cider.

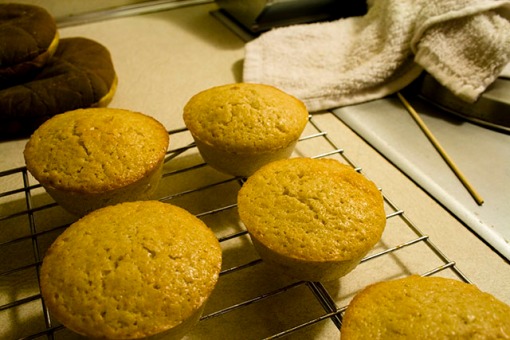
This recipe comes from Coconut & Lime – and really, there’s not much to add! Made as directed, the cupcakes came out feeling a little heavy, but they lightened up as they cooled off. Perfect crispy crust edges, soft interiors, with the flavor of apple cider permeating throughout.

I was less thrilled with the frosting – it just felt grainy to me, and too sweet, although Jeff loved it. The caramel flavoring did complement the apple cider cupcakes perfectly, though. [update: by the next day, the frosting had mellowed out and wasn’t grainy any more, but the flavor was still all there.]

Apple Cider Cupcakes with Caramel Frosting

(via Coconut & Lime)

Ingredients:
2 eggs, at room temperature
1 2/3 cup flour
1 cup pasturized apple cider
2/3 cup sugar
1/2 cup butter, at room temperature
2 teaspoons baking powder
1 teaspoon cinnamon
1/2 teaspoon salt

Directions:
Preheat oven to 350. Grease or line 12 cupcake wells (I used a silicon baking pan, with a mist of pancoat). In large bowl, cream together butter and sugar. Add eggs, one at a time, beating well after each addition. Sift together flour, baking powder, cinnamon and salt. Add 1/3 of the flour mixture to the butter/sugar mixture, then 1/2 of the cider, and repeat, ending with the last of the flour and mixing only until incorporated. Pour into prepared cupcake pan, filling each cup 3/4 way full. Bake 20 minutes or until a toothpick inserted in the center of the center cupcake comes out clean.

Cool thoroughly, then frost.

Apple Cider Cupcakes waiting for frosting

Apple Cider Cupcakes waiting for frosting

Caramel Frosting

Ingredients:
1 cup confectioners’ sugar, sifted
1/2 cup packed brown sugar
2 tablespoons butter
3 tablespoons milk
1/2 teaspoon vanilla extract

Directions:

In a medium saucepan, melt the butter then add the milk and brown sugar. Bring to a boil and continue to boil for 1 minute. Remove from heat, and whisk in 1/2 cup confectioners’ sugar, sifting it into the pan to avoid lumps. Cool slightly, then very vigorously* whisk in the remaining 1/2 cup confectioners’ sugar (or less – I used the entire cup and I felt that the frosting was too thick). Frost cupcakes while the frosting is still slightly warm.

*if you have problems doing this by hand, use an electric mixer, it is very important to whisk very quickly or it will not be smooth.

The food blogonet (blogblossom?) has several running themes, as it were, organized groups of people baking in concert. Sometimes they’re all baking from the same recipe (Tuesdays with Dorie, or Daring Bakers), sometimes just using a common ingredient or theme. I’m planning to participate in a few of these, usually the ones that let me have the most rein for my creativity.

The first is Waiter, There’s Something In My…, whose theme this month is For the Love of Gourd.

(The roundup for all entries us up!  Wow, there are some pretty tasty looking things.)

My gourd? The ubiquitous pumpkin. Remember those pumpkins? Well, I still had plenty of pumpkin left after making up the cute little pumpkin cakes, so I tried to think of something interesting to do with it. I was thinking cheesecake, but maybe a little different…. and then I had it.

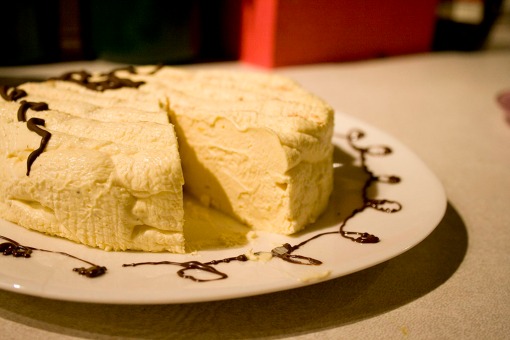
Potiron a la creme

Potiron à la crème

I’d recently acquired Roland Mesnier’s Basic to Beautiful Cakes, and was taken by the Coeur à la crème – an unbaked cheesecake, that you drain overnight in a special mould. The original recipe called for a combination of cream cheese, sugar, and creme fraiche. I thought, “wouldn’t a Pumpkin Coeur a la crème be neat?”, and started looking for a pumpkin-shaped mould that I could turn to my purposes.

I mean, it’s almost Halloween, right? How hard can it be to find a pumpkin-shaped plastic dish that I can poke holes into? Surely people have those plastic candy dishes?

Four stores later, I’d changed the plan somewhat. Instead of draining the cheesecake in a pumpkin shaped mould, I ended up using a 6″ ring lined with an extra layer of cheesecake, set on top of a cooling rack (to make the indentations).

I changed the ingredients up somewhat – I thought the creme fraîche and cream cheese alone might be too tart with the pumpkin, so I swapped out some of the cream cheese for marscapone, and cut back on the crème fraiche. I also added some ‘pumpkin pie spice’ (cinnamon, nutmeg, clove, ginger).

Here are the original proportions:

14 oz cream cheese

6 TB granulated sugar

pinch salt

1 1/3 cups crème fraîche.

———-

Now, I didn’t make exact measurements as I was going along, but it was something like:

1 part cream cheese

1 part pumpkin puree, drained (wrap in cheesecloth and squeeze moisture out)

1/2 part marscapone

1/2 part crème fraîche.

Some sugar to taste

pumpkin pie spices (about 2 tsp, total)

Few tablespoons bittersweet chocolate, melted, for decoration.

Directions:

1. Wet a 15 x 15-inch piece of cheesecloth with cold water and wring out so it is damp but not dripping. Place the cheesecloth inside a 9-inch coeur a la creme mould (I used a 6″ ring set on top of a cooling rack, with a piece of aluminum foil folded up to make an indentation for the ‘stem’), with the edges overhanging the rim of the mould. Place the mould on a rimmed baking sheet.

2. Place the cheeses, sugar, salt, and pumpkin puree in the bowl of an electric mixer fitted with the paddle attachment, and beat until fluffy. In another bowl, whip the crème fraîche with the whisk attachment until it just holds stiff peaks. Gently fold the crème fraîche into the cream cheese mixture.

3. Scrape the mixture into the cheesecloth-lined mould and smooth it with a spatula. Fold the overhanging cheesecloth on top of the mixture, smoothing out the wrinkles where possible, so that the surface is entirely covered. Gently pat it down. Refrigerate the mould, still on the baking sheet, overnight ot allow the excess moisture to drain. (moisture may well have evaporated out of mine, but there was nothing underneat the cooling rack in the morning. Then again, I used less crème fraîche, and squeezed my pumpkin puree to get rid of excess moisture, so there may not have been much to start with anyways).

4. Peel away the cheesecloth that covers the top, and invert the mould onto a serving platter. Lift off the mould and carefully peel away and discard the cheesecloth. Decorate as desired (I piped melted chocolate to make the stem and vines). Let stand for 30 minutes, and serve.

It turned out really, really well. The texture is incredibly silky and smooth, and the taste was pumpkiny with a hint of tartness. Very rich – a small piece does quite well. The chocolate garnish was a good touch, as well – just a hint of chocolately sweetness to mingle with the pumpkiny-tartness. I’m now thinking of ways to make small versions of this for the cafe…

Potiron de la crème

Potiron à la crème

This was an incredible amount of fun! I’m looking forward to next month’s theme.

Pumpkins!

Pumpkin Patch Party Cakes

Autumn is well upon us, even in the South, although it looks different than what I’m used to. The leaves don’t so much turn colors as just fall off the tree (although they are as equally efficacious at clogging up gutters as their northern counterparts), and during the day the temperatures still climb into the 80s on a regular basis – but at night there’s a chill in the air, and the morning ride into work is a brisk one. The farmer’s markets are starting to show mostly autumn produce – squashes, the last of the leafy vegetables, etc. Which means one thing – pumpkins!

I picked up a few baking pumpkins at Trader Joe’s (the local farmer’s market being out of them by the time I dragged myself out of bed on Saturday), and roasted them up to use in various things. I’ve been steaming them rather than straight-up roasting – making a foil tent and putting some water into the bottom of the pan. I find that it’s much faster (takes only half an hour for a medium-sized pumpkin), but that you don’t get those lovely little caramelized bits at the edges. Still tasty, though, at least as much as the canned stuff.

The first thing on my list that I’ve been waiting to try out was a cute little recipe for pumpkin-shaped pumpkin cupcakes (found in Southern Lady magazine, Sept/Oct 2008 – Southern Lady has some really nice dessert content – there are always a few recipes per issue that I want to bake!). Not having a mini-bundt pan, I’d been looking around and ended up getting a mini-kugelhof pan, which is a little narrower at top. And, also, takes less batter – I’d filled the hollows about 2/3 full and had quite a bit of over-spillage at the top. The trimmings were usually as big as cookies themselves – perfect for sandwiching together with some extra frosting!

Pumpkin-top "Sandwiches"

Waste not, want not - Pumpkin-top "Sandwiches"

I also had plenty of batter left over for trying out my new silicon muffin pan, so there really ended up quite the pumpkin extravaganza, as you can see:

The Harvest (plus some NYT chocolate chip cookies, yum!)

The Harvest (plus some NYT chocolate chip cookies, yum!)

And now, the Party Pumpkins!

Pumpkin Patch Party Cakes
Yield:
6.00 servings

Ingredients

  • Nonstick cooking spray
  • 2 ¼ cups all-purpose flour
  • 1 ½ teaspoons pumpkin pie spice
  • 1 ½ teaspoons baking powder
  • ¾ teaspoon salt
  • ½ teaspoon baking soda
  • ¾ cup (1 ½ sticks) unsalted butter, softened
  • ¾ cup packed brown sugar (I used light)
  • ¾ cup granulated suar
  • 3 large eggs
  • 1 (15-ounce) can LIBBY’S 100% Pure Pumpkin (I used my own home-roasted pumpkin puree, yum)
  • ¾ teaspoon vanilla extract
  • 1 recipe Orange Cream Cheese Icing
  • Garnish= 6 (4-inch) cinnamon sticks (I used chocolate-dipped Vanilla Stix, but you could totally use chocolate-dipped Pumpkin Pocky) Orange Cream Cheese Icing:
  • (Makes about 1 cup)
  • 1 (8-ounce) package cream cheese, at room temperature
  • ½ teaspoon orange extract
  • 1 cup powdered sugar
  • 2 tablespoons milk

Directions

Preheat oven to 350F. Spray two 6-cavity mini-fluted tube pans with nonstick cooking spray.

Combine flour, pumpkin pie spices, baking powder, salt, and baking soda in medium bowl. Beat butter and sugars in large mixing bowl for 3 to 4 minutes, or until creamy.

Add eggs, beat well.

Add pumpkin and vanilla extract, beat well.

Gradually beat in flour mixture (do not overmix! Just mix until wet.) Spoon evenly into prepared cavities (about ½ cup batter in each). [Note: Here I used a pastry bag and piped the dough in – less mess, and easier to get consistent levels and layers of filling] Gently tap pan on counter to release air bubbles.

Bake for 20 minutes, or until wooden toothpick inserted in cakes comes out clean. Cool in pans on wire racks 10 minutes; invert onto wire racks ot cool completely. With serrated knife, carefully cut off bottoms of each cake so surface is level/flat. (Tip: save the bottoms to enjoy later – and did I!)

Prepare Orange Cream Cheese Icing.

Spread 1 tablespoon icing over cut side of cake to within ½ inch of edge on your 6 uglier cakelingsot to avoid the edge, therefore cream cheese ‘bulge’. Oops] Reserve remaining icing. Place the 6 uniced cakes on top of cakes with icing, making cute little pumpkins. (Save the nicer ones for toppers); be sure to spread mixture over hole in center. [You’ll note that I totally forgot this step, hence a little frosting ‘bulge’ – oops.]

To serve: thin remaining icing by adding 2 Tablespoons milk; beat until smooth. the consistency should be thin enough to drizzle; add more milk as needed. Drizzle over cakes. Garnish with one cinnamon stick (or pocky) “stem” in the center of each “pumpkin”.

[At this point, I also sprinkled a little nutmeg on the top; cardamom would also be nifty.]

Construction was uneventful, although I did forget to keep the frosting contained (so there’s a visible layer between the top and bottom of the pumpkin, oops). I opted to forgo the cinnamon stick (as inedible) to serve as the stem, instead coating shards of vanilla stix (link) in chocolate and using those (although Pocky would work equally as well, and now they make pumpkin pocky! Win-win, there.). A little sprinkle of nutmeg over the glaze finishes it off for the pumpkins – I used cardamom on the cupcakes, which melded nicely with the other spices and pumpkin flavor. The orange in the glaze really worked well with the pumpkin – I usually find powdered-sugar based glazes too sweet, but just a little hint of citrus cuts that.

The pumpkin cake recipe itself was perfect – good pumpkin flavor, good crumb, without being too wet (although the cupcakes took longer to cook than usual – perhaps something to do with the silicon baking pan?). I’ll definitely use it again.

Cute and tasty! These disappeared quickly.